Thursday, May 28, 2020

Retrogrouch Tool Time: Tire Jacks

Ever had that moment when putting a new tire onto a rim, and after you work the tire onto the rim all the way round, you get to the last couple inches, and no matter how hard you try, you can't get those last couple of inches of tire bead over the lip of the rim?

When that happens you want a tool known as a "Tire Jack."

Chances are, most cyclists have encountered a difficult-to-mount tire at some point or other. It's hard to pinpoint exactly why it happens. Sometimes it's the tire, sometimes it's the rim, and sometimes it's just the wrong combination of tire AND rim. Some brands or models of tires just seem to fit extra tight no matter what rims they're tried on. And one occasionally finds rims that, for whatever reason, will present a problem with any tire (a little larger in diameter than spec?). In any case, a tire jack is the tool that will safely coax those last inches of tire bead over the rim.

I've seen a couple different brands/models of tire jacks out there, but the most common one is sold by Kool-Stop, like this one here:

Interesting thing - the Kool-Stop name appears nowhere on the tool - but the name "Simson" is molded into the handle. I can only assume that is who actually manufactures the tool for Kool-Stop.

It's a simple tool that lets you apply a good deal of leverage. There is a stationary arm that ends in a "Y" shape, and a hinged arm with a hook at the end. The "Y" part braces against the rim on one side of the tire, while the "hook" part is placed under the bead on the other side, then you use the leverage of the long handle to pry the bead over the lip of the rim.
Like this:

And this:

I've had some frighteningly tight tire/rim combinations, but I've never had a tire that was so tight that I couldn't coax it onto the rim with this tool.

The Kool-Stop is a good tool to keep in the toolbox or workshop. But if you're out on the road and need to change a tire (and you know from experience it's going to be a challenge to mount), then there is a great "mini" version made by VAR that fits in the palm of your hand and can be packed easily in a saddlebag.

The VAR tire tool is pretty brilliant - consisting of a pair of tire levers for removing a tire, and a mini-version of a tire jack for getting it back on. The levers are maybe a bit too flexible to be ideal for removing a really stubborn tire, which I find to be true of most plastic levers. But the jack can be helpful in saving your thumbs when re-mounting the tire out on the road. As good as the full-size jack? Well, no -- it's only a fraction of the size, and a lot less leverage -- but it does make a difference. I have a couple of them stashed in saddlebags on different bikes.
One of the tire levers is stored in the center of the tool. As far as I know, VAR still makes these, but if you find them for sale today, expect the current production ones to be blue, not gray.
Both tools are pretty reasonably priced. The full-sized Kool-Stop tool sells for somewhere in the neighborhood of $15, and the travel-size VAR tool sells for anywhere from $10 - $20 depending on the seller, and where they're located - but it's probably the least expensive tool you'll ever get from VAR. Considering that many bike-specific tools can be awfully "spendy," these ones are a good addition to the tool collection, even if you're on a budget.

Monday, May 25, 2020

Memorial Day Ride - and RIP John Forester

I got out for a nice Memorial Day ride this morning. Our weather is sunny and unseasonably warm. I left early while it was still reasonably cool, hoping to beat the heat, but by the mid-point of my ride it must have already been nearing 80 degrees with high humidity.

I stopped for a photo near this little cottage in the national park. I'm not sure of the history of this place, but it has been vacant for as long as I can remember, and is (I believe) currently owned by the park service. They own a lot of the old houses in the park - some are used as offices, and a few are leased out to various groups, but not this one, apparently. It reminds me a bit of the cottage-style motels that used to dot the highways, but I don't think that's what this was. It's like a tiny duplex, in the midst of what used to be mostly farm land, so I wonder if it might have been lodging for seasonal farm workers for one of the local farms. Who knows? Cute little place, though - and a good spot for a bike photo.
The other thing I wanted to write about today was that I recently learned of the death of John Forester, whom many consider one of the "founders" of the modern bike advocacy movement, and the riding philosophy generally known as "vehicular cycling." I'm actually a bit late on this, as he died over a month ago on April 14 at age 90.

Forester was born in England in 1929, the son of Cecil Scott "C.S." Forester - author of such noted novels as the Horatio Hornblower series, and The African Queen (adapted into a classic film starring Humphrey Bogart and Katherine Hepburn). He moved with his family to California when he was 10 years old, and he would later take on American citizenship. He graduated from Berkely in the 1950s and had a stint in the U.S. Navy. He was a lifelong cyclist.

Living in the Palo Alto area in the 1970s, he famously received a ticket for riding in the street, and refusing to ride in the recently created bike-way. He fought the ordinance that mandated cyclists to use the bike-way and won. Many people cite that action as the beginning of a movement. He would go on to write numerous articles for cycling magazines, and became very involved in the fight against the Consumer Product Safety Commission's (CPSC) safety regulations on bicycles, which he believed were poorly written and conceived - and failed to distinguish adult bicycles from children's toys.

I have the 6th edition.
Forester should well be remembered for his book Effective Cycling which has been through 7 editions since it was first published in the 1970s. Though some people today may argue against some of his methodology, I believe his advice on sharing the road with motor vehicles - with the same rights, and responsibilities as motorists - is generally sound, and it is advice that I have long followed.

He was a controversial character in the bike advocacy movement, frequently ruffling feathers and clashing with other prominent advocates, in part because he was a staunch opponent of bike lanes and bicycle-specific infrastructure. That was a point that many modern advocates clashed with him on, and I'm sure there are some who believe that, if not for Forester, every city in the U.S. would be like Amsterdam. As for myself, I'm highly skeptical of such claims, and assume them to be grossly exaggerated. Personally, I tend to disagree with "all or nothing" approaches to anything, regardless of which side of an issue people are on, but in order to understand the reasoning behind Forester's stance, it's important to know that in his experience, and from his point of view, most bike lanes were poorly designed by people who did not ride or understand the needs of cyclists, and the efforts were typically undertaken NOT to help cyclists, but rather, to restrict them and keep them off the roads. People often described him as "inflexible" - but I think it helps to know where he was coming from.

Whether people agreed or disagreed with him, I think a lot of us owe some gratitude to Forester. Rest in peace, sir.

Saturday, May 23, 2020

Bike Safety 101: The Ballad of the Battered Bicycle

Welcome back to Bike Safety 101, where I pick apart old bike safety "educational" films and other materials - most of which would generally leave a person with the idea that they'd be much better off if they never threw a leg over a bicycle again. I haven't had a Bike Safety 101 post in a long time, but I recently watched a particularly dreadful old film that demonstrates that Americans weren't the only ones cranking out corny anti-bike propaganda. Today's film: The Ballad of the Battered Bicycle, a British film from 1947. The film features British stage and screen actor Stanley Holloway (maybe best known for My Fair Lady) as the rhyming narrator.

For reasons I can't quite fathom, the first full minute of this 9 ½-minute film is a montage of circus/carnival scenes:


And then we get to our narrator, Holloway, as some kind of carnival sideshow barker:

"I'll tell you now a dreadful tale of sorrow and of woe
about a wicked crime committed not so long ago. . .

. . . And that's it for the carnival, never to be seen again in this film. At this point, the film cuts to the bike shop where Henry, the hapless subject of the story, gets a new bike.

As his father pays for the shiny new bike, Henry immediately heads off on a path of destruction. "Now Henry's face lights up with joy - the bike shall be his pride - his father stays behind to pay - but he jumps on to ride."
Goofing off with friends and riding no hands, Henry and his new bike take the first of many spills.

Little Henry can't ride a straight line to save his life (literally and figuratively). Weaving down the middle of the road, he runs afoul of cars, lorries (that's trucks to us Yanks), produce carts, and buses.

. . . not to mention riding double - a staple of corny bike safety films.

Gradually Henry's bike gets shabbier and shabbier - with wobbly wheels, missing parts, and fenders held on with string.

And it all leads to this: careening through a "halt" sign, into the path of a bus - cutaway to the face of fear - and the tragic outcome.

Luckily for Henry, he's alive, but the bike is toast. The bus driver and all the passengers gather around him to point and jeer. "The passers by all gather round with faces hard and grim - and Henry understands at last what people think of him. Now every mouth spits out his name - whispers on every breath - that is the boy, young Henry Brown, who rode his bike to death."

And at this point, Henry is put on trial for "murdering" his bicycle.

"The judge and jury stare at him with pained and saddened eyes - while on the table cold and still, the battered cycle lies."
One by one, witnesses come forward to testify against Henry for reckless riding and for not taking good care of his bike. The jury finds him guilty, and the judge (also played by the narrator, Holloway) sentences him to two years walking.

"The moral of this yarn is clear - to stress it I should like - you have a duty to the world when you ride on your bike."

So, the film begins with a carnival - and ends in a courtroom. And the barker becomes the judge. Makes perfect sense (?).


Other than showing some examples of bad riding behavior, there isn't really a lot of rider education in the film. There is no depiction or discussion of what better riding might look like, or how to share the road properly and safely. And the biggest concern in Henry's trial is NOT that he ruined what seemed to be a pretty nice bike, or that he nearly got killed - but rather, that he might have "upset the bus."

The overall message of the film might have something to do with its producer - the Petroleum Films Bureau, which produced "informational," and "instructive" documentary films about the petroleum industry and automotive-centered topics, in addition to a few other "general interest" subjects.
Not that you're likely to learn anything from it - but if you enjoy corny old films as much as I do (or even just enjoy picking them apart) - you can watch The Ballad of the Battered Bicycle here:


Enjoy!

Monday, May 18, 2020

Bike Commuting Wrap-Up: Coronavirus Edition

With our school year drastically "truncated" due to COVID19, and with the announcement that we are definitely not going back before Fall, I suppose it's time for a look back at my bike commuting numbers for the year.

Up until the shutdown, I was actually having a pretty good year, commuting-wise. One of my best, in fact. I was well on track to be able to ride over 100 days, and I am fairly certain 110 might have been within reach. Well, we all know what happened next. Schools and many businesses in Ohio (and across the country) were closed in mid-March, and that put a cap on my commuting numbers until next year.

At the time the shutdown happened, I had ridden 82 days -- not too far off the 90 days I had set as my "minimum" goal for the whole year back in August. But given the truncated schedule, that still gave me a bike-to-work average of 61%. Considering that April and May are usually pretty good riding months for me, I'm sure that had we not closed early I could have improved that average, and nothing that I've seen of the weather we've had since March tells me otherwise. But 61% is still one of the better years I've had. In fact, last year I had only reached 80 days overall in a normal full-length school schedule. I beat that with 2½ fewer months of work!

So, here are some numbers. As already mentioned, 82 days gave me an average of 61%. At 28.5 miles each day, that works out to 2337 miles, and a savings of somewhere around 82 gallons of gas. At current gas prices, that's a savings of around $150, or somewhere in that neighborhood (gas prices have been pretty cheap the past year, haven't they?).

This also helped my long-term average slightly. I've been commuting by bike regularly for about 8 years now, and with this year factored in, my overall average ticked up slightly to 54%. In 8 years time, I calculate that I've ridden more than 21,000 miles just going to and from work.

I wish I could have gotten some more pictures from my commuting rides - but I was still riding in complete darkness through my entire morning commute when things shut down in March. So I'm going to have to post a re-cycled photo from the ride to work. Sorry about that. Here's a good one from last year - maybe I'll end with this:


. . . And let's just see what next year brings.

Thursday, May 14, 2020

Old Is Good: 1950 Mercian

Regular Retrogrouch readers know that I'm kind of a nut over Mercian bicycles. I have a pretty sizable collection of them myself - some older, some not so old. But whenever I see one, I have to take time to look it over. If it's my size and it's for sale, I can't help but contemplate whether or not I can add it to the collection.

I just recently saw a very special example that I really want to share here. It's not mine - and I don't think it's ever going to be - but it comes from Ken Wallace at the Bisbee Bicycle Brothel in Bisbee, Arizona. This is a very special bike for a number of reasons.

One, it's one of the earliest examples I've ever seen from the brand. It dates to 1950, and the Mercian shop had only opened for business in 1946. According to Ken, it was likely built by Tommy Crowther, who was one of Mercian's founders, along with Lou Barker.

Two, it's absolutely gorgeous and unique. It has beautiful hand-cut lugs in a shape that I've never seen before - not on a Mercian, and not quite like the ornate lugs even on other bikes known for such things. It also has a very rare head badge - the likes of which I've only seen on one other bike in all the years I've been following them.
Here's a shot of the head-tube and a very rare badge.
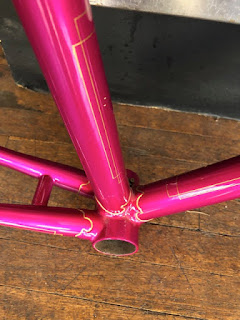
The color combination is pretty spectacular, too. Sort of a flamboyant fuchsia with white contrasts and gold lining.

. . . even has some chrome on the fork crown and "socks."

The shape of these lugs is really cool. It's possible that the shape of the Vincitore lugs (the brand's "fanciest" model since the late '50s or early '60s - and still made today) was partly inspired by these - but it's still a very different look.

A nice look at the seat lug -- notice that it also has some cool "box pin striping"

Even the bottom bracket carries the theme of the other lugs.

Interesting "arched" seat stay bridge - another detail one doesn't usually see on Mercians.

The serial number tells some of the story - 162nd frame built in 1950.

The paint condition is spectacular -- I thought perhaps too nice to be original. Ken confirmed that it was repainted at some point. Another clue pointing to a repaint was the downtube decal lettering which is of the current style, which I believe was introduced in the early '60s. Mercian bikes I've seen from the 1950s usually have a "script" lettering style like this:


It's clearly a really special bike. And it's just one of many special bikes at Ken's shop - which is as much a bike museum as it is a bike shop. I've never been there (never been to Arizona, for that matter) but I'd love to visit the place in person.


A couple pictures of the shop - all from their website.

There are not only tons of gorgeous vintage bikes, but also vintage parts, many photos, posters, and other bike-related nostalgia.

There's the same Mercian, up on the wall.
About ten years ago, Ken's shop was featured on a TV show called Arizona Highways. Here's a link to the video on YouTube. Enjoy!


Thanks, Ken, for sharing your Mercian with the Retrogrouch Blog.

Tuesday, May 12, 2020

Retrogrouch Tool Time: 3rd and 4th Hand Tools

Ever wish you had another hand?

Granted, literally having another hand would make buying shirts more difficult - but when working on bicycle brakes and cables, there are a couple of ways to get that extra hand when you need it.

Let's take a look at some bike tools with a very "handy" name: 3rd-hand, and 4th-hand tools.

A 3rd-hand tool is used when working on most types of rim brakes, whether sidepull, centerpull, or cantilevers. In use, it holds the brakes closed, with brake pads close to the rim while you tighten the cable fixing bolt.
The "spring" type of 3rd hand tool in the upper part of the picture is pretty generic and has been made by lots of different companies over the years. No idea who made this one - I found it in a box of assorted tools in a garage sale. The Var 02 tool below it is the "ne plus ultra" of 3rd hand tools, if you ask me. That's my "go to" when replacing brake cables. I like that you can control how much pressure you apply to "squeezing" the brakes, because I think a 3rd hand tool works best when it doesn't mash the pads tightly against the rim indiscriminately. The only drawback (if you can really call it one) is that it won't work with deep-section aero rims. Since none of the bikes in my collection have such abominations, that isn't a concern.
Another "handy" tool is the 4th-hand tool, which is good not only useful for brake work, but (in my opinion) is indispensible when replacing derailleur cables. That's basically what a 4th hand tool does - it pulls the slack out of cables before you tighten the fixing bolts.

Mine is the Hozan 4th-hand tool. There is a Park version of this tool that adds a thumb lock feature which I suppose means it would continue to hold the tool tight even if you let go (and I don't know why you'd do that). But the Hozan is a  sturdy classic and works as well as I could want it to.

The way a 4th-hand tool works is that it acts like pliers with double-hinged jaws. One part of the jaws grabs hold of the end of the cable, while the other side of the tool butts up against the component (whether brakes or a derailleur). As you squeeze the handles, the jaws spread apart, pulling the slack out of the cable. Then with your free hand you can tighten the pinch bolt.

Some say that when working on brakes with a 4th-hand tool, you don't need a 3rd-hand tool, because while the 4th-hand pulls the cable tight, it can also squeeze the brakes to the rim. That may be true, but I still like having both. I especially find that, when working on either cantilever or centerpull brakes - with their straddle cables and yokes, etc. - having both tools works nicely with very little cable adjustment needed afterwards.

And besides - there are very few bike-specific tools where somebody doesn't eventually make the argument "you don't really need (fill in the blank)" and I tire of those discussions pretty quickly. If you follow that one to its logical end, eventually you arrive at "I've got some vise-grips and a hammer - and I can fix anything."

Check back from time to time, and I'll highlight some other fun items in the toolbox.

Friday, May 8, 2020

More Workspace Organizing

With my school year effectively shuttered indefinitely, I had to go in today to pack up my stuff. A couple of years ago I had a post about my classroom, which has a number of my vintage bicycles on display. Keeping some of them at school not only frees up some space in my basement, but also gives me (and the kids) something to look at while I'm working, and just makes for a much more interesting environment. But packing everything up for the Summer means bringing all the bikes back home so they're safe and available for riding. However, figuring out where to put them all is always a challenge.
Just one corner of the classroom. A vintage bike on the wall, and the commuter beast below. On any given day, there are usually 5 or 6 bikes.

I'm wishing I'd have taken a photo of my little station wagon all loaded up for the drive home. Two bikes on the roof, two more on a rack on the rear hatch, and one inside with the seats folded down. It was a sight.


Since getting my workshop nook cleaned up and organized, and with a bit of space-saving creativity, I had room to get two of the bikes in there, yet still out of the way (hanging vertically on the back wall). But I still had three more bikes that needed some space.

Just on the other side of the door to my workshop is another little nook that's been pretty neglected for a lot of years:

I've got a bike on hooks up on the wall, and my tandem bike on the floor below it. But as you can see, I also had a bunch of boxes and crates, assorted junk, and piles of rags. It's also where we keep a few storm windows and screens stacked up when they're not in use. The solution to the junk problem was obvious: I had to sort through it and get rid of anything I haven't used (or even felt the need to look for) in a bunch of years. Then I consolidated whatever was worth keeping into much more compact and sensible storage solutions. The tandem presented a bit more of an issue. It's really too long to fit where it is (it has to go "diagonally" across the whole nook). I cleared away and rearranged some things over on the opposite side of the room and moved the tandem over there, where I had a much longer wall space available.

And yes, we still have several old doors. We'll never use them, but with an old house like ours, you hate to get rid of them, and standing up along the wall, they don't take up that much floor space. But with other junk cleared out, the tandem fits much better over here.
With the junk cleared out of the nook, and the tandem relocated, I suddenly had room for three more bikes. I put some hooks up into the joists so I could hang two of them vertically, while a third was able to hang below the other one along the left wall. And the great thing is that I when I want to ride, I can still easily access any of them without having to move or shift the others out of the way. Brilliant!
I have to say that the coronavirus shutdown has had some terrible effects that will be felt for a long time to come. But if there is any possible "bright side," it would have to be that it has made time for a lot of things that otherwise have been neglected.

Tuesday, May 5, 2020

Retrogrouch Tool Time: Crank Bolt Tools

If you spend much time doing your own bike maintenance, eventually you end up with a pretty nice assortment of bicycle-specific tools. And one thing I've found about vintage bike nuts (myself included) is that many of us are just as nuts about bicycle tools as we are about the bikes themselves.

Now that I've gotten my workspace all cleaned up and organized, I thought it might be worthwhile to talk about some of the tools in my collection. And with that in mind, I figured I'd start with a fun one -- the crank bolt wrench, sometimes known as the "peanut butter wrench."

From top to bottom: Park 16mm, Park 14mm, Campagnolo 15mm, another Campagnolo, and T.A. 15.

Legend has it that they got their culinary nickname because racers during multi-day races would sometimes improvise meals, and the shape of the handle made it useful for spreading peanut butter. I honestly don't know if anyone ever actually used one for that purpose, or if it's just a myth. If anyone is willing to admit that they have actually spread peanut butter with their "peanut butter wrench" I'd love to hear from them.

Oftentimes, a person only needs one of these, and 15mm is probably the most common. And that size is also useful for the axle nuts on most track bikes. But now and then you might find a crank attached with 14 mm nuts (typically on cheaper bikes with a solid bottom bracket spindle), so I like having that one available. The 16mm size is a real oddball. It is most often found on old Zeus cranks, which are seldom seen these days. I would like to have an actual Zeus wrench (for nothing but "emotional" reasons), but those are awfully rare, and they tend to sell for a premium when they come up on eBay. The Park one isn't all that common these days, either, to tell the truth. I've only encountered the 16mm crank bolts once in all the bikes I've worked on over the years, but I'm glad I have the right wrench.
Sometimes a standard socket just won't fit in the gap.

OK - so if someone has a full metric socket wrench set, why do they need a special crank bolt wrench? Well - the gap between the bolt head and the recess in the crank itself can be pretty narrow - and the "walls" of many sockets are often too thick to fit in the gap (and this is especially true with the 16mm size). Sometimes people will improvise by taking a standard socket and grinding it down to fit, but that's an unsatisfactory solution to a tool lover.

In my own collection, I have two of the Campagnolo wrenches. One is quite a bit older than the other. There is a difference between them visually -- the older one (the upper one in the picture above) has a "pebbly" texture in the background behind the name. I got that one from an old bike shop many years ago and it probably dates to the 1970s. The other one probably dates to the 1990s or early 2000s and has more like a "cross-hatch" pattern behind the name. I have two because sometimes I pack one of them with me on rides with my fixed-gear bikes in case I need to remove a wheel. The T.A. one is perhaps a bit superfluous, so I suppose I have it because . . . "collecting."

To go along with the crank bolt wrenches, I have a couple other items to show:

A pair of Campagnolo crank pullers. The part that threads into the crank is 22mm, which is the standard for most square-taper cranks, so it gets a lot of use. Some older T.A. cranks used 23mm, and some older Stronglight cranks used 23.35 (which was just an evil thing to do). OK - so why do I have two of these? One is normal "right-hand" threaded - which is the most common. The other is "left-hand" threaded, and is only used on cranks that have a "one-key" allen bolt release system, such as the '80s vintage Campagnolo C-Record. If for some reason the "one-key" system fails, it is possible to remove that from the crank, and install this tool to remove the crank from the bottom bracket spindle. It's quirky.

Though the regular right-hand puller above works on most cranks, I do have a Park branded one (not shown) that will work on the 23mm T.A. cranks. I don't currently have the 23.35 Stronglight puller, and so far have not needed one. It's important to mention that a lot of old Stronglight cranks have been damaged because people used the wrong puller. A 23mm puller will seem to thread in well enough to fool a person into thinking it's fully engaged - but when they start applying the pressure needed to remove the crank, the threads get stripped out. OUCH!.

And I also have this:

This is a Campagnolo adapter and 7mm allen wrench - meant to be paired with the 15mm wrench shown above. I just mentioned previously that Campagnolo cranks in the 80s had a "one-key" release system. These consisted of a puller threaded into the crank (using left-hand threading), and then a 7mm allen wrench was all that was needed to remove the crank. But one can't always apply enough torque with a typical 7mm allen wrench to remove a crank. So that's where this thing comes into play.
It would go together something like this. It's possible I've put this together "backwards" somehow, but it doesn't seem to make a difference.
In practicality, though, I've found that this 7mm allen socket on a standard ⅜ inch socket driver works just as well, and requires no "assembly."
Tools like these aren't really needed much if all a person has are "modern" bikes. Many cranks today can be removed and installed with no more than an allen wrench. But if you work on vintage bikes, or if your cranks still attach to an old-style square-taper bottom bracket, they can be very useful. And having some variety means there are just that many more old bikes that you'll be able to work on.