Monday, February 10, 2020

Mullet Gearing?

So, here's a new one on me: Mullet Gearing.

Business in front,
party in the back.
I was scanning some of the other bike-related websites - industry cheerleader blogs, etc. - when I first encountered the reference to a "mullet bike" or "mullet gearing."

I assume most people are familiar with the frequently-ridiculed hairstyle it takes its name from, epitomized here by the David Spade character, Joe Dirt. Short in front and on the sides, but long and cascading down in back - like a hair waterfall.

Well, apparently, this is now the name given to a recent trend of putting MTB gearing on a drop-bar road bike. Typically it would have the drop-bar road controls (business in front?), and a 1x11 or 1x12 drivetrain (party in the back?). And for the true full-blown mullet in all its enthusiastic glory, it should have a cassette with a range of something like 10-50 teeth.

Holy cow. People must really hate front derailleurs.

An SRAM-equipped  "mullet bike" - from the SRAM website.
More than anyone else, they seem to be embracing the trend.
Yes, with 11 or 12 sprockets on a cassette, and with some of today's MTB derailleurs being capable of shifting to that 50-tooth sprocket, one can obviously get tremendous gear range with a single chainring, and no "duplication" of ratios.

Having such a wide range on a cassette would, I expect, mean pretty large jumps between gear ratios. But with 11 or 12 cogs, proponents say that effect is minimized (note: minimized). And apparently, at least one company (Spanish component maker, Rotor) is now offering 13 cogs! Jeezus.

Fans of the mullet tout the weight savings of losing a chainring and the front derailleur, although that's got to be mitigated at least a little by the huge cassette cogs, not to mention adding more (and still more) of them, which are more likely to be steel than aluminum. And then there's the issue that as chains and sprockets keep getting narrower, the shifting has to be much more sensitive to misadjustment, dirt, and wear. And yet, this seems to be where we're going.

Good or bad, I don't know, but I guess it's the hot new trend for "gravel" and "adventure" bikes.

As for me, I'm still unsure where all the hatred for front derailleurs comes from, but I'm still more than happy with a compact double crank and 6 cogs in back.

Now, if you'll excuse me, I've got a leather saddle and a can of Proofide waiting for my attention.

Friday, February 7, 2020

Gathering Parts - Saddle and Seatpost

For this installment on the components for my early '80s Sequoia, let's take a look at the saddle and seatpost I've chosen for the build.

Anyone who's been reading this blog for a while knows that these are my favorite saddles: Brooks B17. This is the "Champion Standard" model in antique brown, with the small chromed rivets. The more expensive "Special" has a skivved lower edge and larger hammered copper rivets, and many of those also have copper plated rails. They're nice, but I'm OK with either version. My backside can't tell the difference. Some say the leather on the Special is a little better, but I don't know if that's true - at least I'm pretty sure the folks at Brooks would refute that claim.
Regular retail price on a B17 "Standard" is somewhere around $120. Expect about $30 - $40 more for the "Special." One can often find the "Standard" offered by sellers online for $85 - $90. But the real secret to finding a bargain on a Brooks saddle is to watch eBay for ones that have been removed by their original owners to be sold after a few miles of riding. There might be some marks on the rails from having been mounted to a seat post, or maybe a blemish in the leather, but you can expect to save another $10 - $15 below the online retailer prices, and it's easy to dismiss the blemishes with the knowledge that it's going to get more once it sees some use.

The SR Laprade was probably the most common seatpost one would see in the '80s - they were  ubiquitous standard-issue original equipment on many Japanese-built bikes at the time, including a lot of Specialized Expeditions and Sequoias. Because they were so common, they're still easy to find today and reasonably priced, whether NOS like this one, or clean and lightly used. Truth be told, I actually prefer 2-bolt seatposts (the Nitto Jaguar, aka "Frog," is my favorite) but the Laprade seemed like a natural choice for this project. 
Just a brief post today. The Sequoia is still at the painters, but don't think it will be much longer. Starting to get excited!

Monday, February 3, 2020

Gathering Parts - Brakes and Levers

As I'm highlighting my various choices of components for my early '80s Specialized Sequoia, so far I've described my choices for wheels and drivetrain components. Today's installment is on brakes.

The Sequoia was designed for "normal reach" brakes - which means those with a range from about 47 - 57 mm. It seemed to me that the perfect choice for keeping consistent with the era was to use vintage SunTour Superbe brakes (mod. 4700). A lot of brand-new Sequoias probably left bike shops with these brakes installed. In my view, these were the first Japanese-made brakes that really rivaled the quality and finish of Campagnolo's brakes in every detail. Up to this point, other Japanese-made brakes, even top-of-the-line ones like Shimano Dura-Ace, were very nice overall, but maybe in some small area, like the quality of some of the smaller parts (like cable adjusters, or the quick release mechanism) would leave something to be desired. These ones really nailed it, and subsequent brakes from SunTour, Dia Compe, and Shimano would actually surpass the best by having not only excellent materials and finish, but lighter and smoother action as well.

As I understand it, these are the second version of the Superbe brakes. The first version having a somewhat "lesser" quick release mechanism - whereas these have a truly deluxe (and smoothly operating) eccentric cam, obviously modeled after the Campagnolo design. The Superbe brakes were made for SunTour by Dia Compe.

It's hard to tell these were ever used. Even the pads look almost new. I may end up replacing the pads, however, as these are likely to be pretty hard by now. I believe Scott-Mathauser makes replacements for these holders, and their "orange" pad material isn't that far off from the original rusty brown color used by SunTour. Something to consider.
For levers, I'm faced with a choice:

These original Superbe non-aero levers are in great shape - except for the fact that they need new hoods. Original SunTour-branded rubber hoods are nearly impossible to find, and I haven't seen reproductions. However, these take the same hoods as the classic Campagnolo Records, and there are some no-name or aftermarket branded hoods that will fit. The ones from Rustines come to mind (available from Velo-Orange, last time I checked). I like the slotted/drilled levers, and these ones are almost completely free of scrapes or blemishes. They would be a good, traditional choice.

Then again, I also have these mid-'80s Dia Compe aero levers that are likewise in excellent condition. Aero levers first started coming into popularity about the same time my Sequoia was built, so they would not be out of place. This pair (AGC 251 - circa '86) are an improvement over the earliest versions of aero levers in that they have a return spring built in for smoother operation. They look great, have a nice shape overall, and the hoods are soft. If I were trying to do some kind of perfect "period correct" restoration, right down to the dates of all the components, I might balk at putting 1986 or '87 levers on a 1982 bike. But it's my bike dammit.
That's all for now. Stay tuned for more. . .

Monday, January 27, 2020

Old Is Good - And Sometimes New Again: Bar-end Shifters

I've been thinking about shifters lately.

As I've been working on a current project, I was trying to decide what shifters to use, and I had several choices - one of them being bar-end shifters.

Ever since Shimano introduced their STI system (Shimano Total Integration) with the brake and shift levers combined into a single complex (and expensive) unit, practically any road bike sold today has some version of "integrated" brake/shift levers, or as some of us call them, "brifters." I've been told that only "squares" call them "brifters" and that all the cool roadies laugh at the term and at the people who use it. But what can I say? Like most retrogrouches, I'm so "square" that I still say things like "square" (as opposed to "groovy"). Anyhow, Saint Sheldon called them brifters, and who am I to argue with that?

Lots of people call the integrated brake/shifter systems one of the greatest developments in modern cycling. The thing is, I've got a couple of bikes with brifters: one with Shimano's STI, and another with Campagnolo's Ergo. They're nice, but the main thing either system has going for it is convenience. With shifting controls right there at the fingertips, it seems to me that one shifts gears a lot more frequently. Is that because the levers/buttons/paddles/or-what-have-you are so close at hand - or is it because they are usually paired up with a drivetrain that has anywhere from 8 to 12 cogs in the back (multiplied by however many chainrings one has)? Shifting is easy, so you shift more often. But is it necessary? Better? I'll stick with convenient.

Then again, bar-end controls have probably 80% of the convenience with fewer drawbacks than brifters (yes, I came up with that figure after careful scientific analysis, and in no way is that a subjective, made-up, "gut-feeling" statistic).

What drawbacks? How about cost, complexity, and vulnerability? The location of integrated brake/shift levers makes them more vulnerable to crash damage. Case in point: I hit some black ice on my commuting bike last winter, hit the pavement, and knocked one of the brifters half-way round the handlebar. Luckily they just got scuffed up but didn't break - but if they had, there would have been no repair option other than full replacement (and could I have bought just one brifter, or would I have had to buy the whole set?). If they do get damaged, or if they wear out, the only remedy in most cases is to replace the entire unit, which is not exactly cheap. Then there's the complexity of the systems which means there is a lot going on in that small package, and a lot more that can go wrong. I don't know about others, but I find it really annoying to have to replace an entire component or a whole system all because one small part broke or wore out. Campagnolo levers have an advantage over Shimano in that one can replace internal parts when they get worn - but doing so might be beyond the capability of most home mechanics and even some shop mechanics. Just like our computers, phones, televisions, appliances, and other electronic goods, integrated controls on a bike become yet another situation where "repair" really just means "replace."

Keeping brake levers and shift levers separate means that individual components can be much simpler with less to break or wear out. If they need maintenance or repair, they can be easier to work on. And if something does need to be replaced, one can often replace the individual part or component and not a whole system. If one crashes and damages a traditional brake lever, the shifting components are unaffected, and replacing a brake lever alone is a lot cheaper than an integrated component. Or conversely, if the shifter needs to be replaced, the brake levers are unaffected, and so on.

Also, both down-tube shifters and bar-end shifters are less vulnerable to damage. And the bar-ends levers are still easy to reach and can be operated without removing one's hands from the bars, though it might mean moving the hands away from the brake levers for a moment. If you really must brake and shift simultaneously, as I'm sure everyone does regularly, you've just lost some convenience.

Bar-end shifters have been around a long time - at least since the 1940s, if not earlier. The overall style of bar-end shifters hasn't really changed much since they were first introduced, and many of them look outwardly similar, though the internal mechanisms have changed some. Here are a few notable ones, old and new.

When Campagnolo introduced its first parallelogram derailleur, the Gran Sport, they also offered a bar-end lever, going back at least as early as 1953 (judging by their catalogs). The examples above, with the familiar blue covers, probably date to the '70s but were made for a couple of decades (as I understand it, the smaller parts are not interchangeable with the earlier Gran Sport ones). I once had a pair of these, and my main complaint was that they had to be set very tightly to prevent slipping or "auto-shifting" but when they were tight enough not to slip, they were awfully stiff to move.

Simplex bar-end control: earlier basic friction version. I have no personal experience with these, but mechanically speaking, these aren't all that different from the Campagnolo version shown above, and I'd expect them to work similarly. 

Simplex Retrofriction Shifters: These came out in the 1970s and have the same spring-clutch mechanism that made their Retrofriction downtube levers such a revelation. I've never used the bar-ends which are harder to find than the downtube mounted version (which I have and do use) - but that spring in the middle of the lever lets them work smoothly with a light touch, and without slipping.
SunTour Power Ratchet Bar-Cons: These were introduced in the early '70s and became among the most popular bar-end controls of all time. The concept is similar to that of the Simplex Retrofriction ones shown above, but the execution is a little different. These have a fine ratcheting mechanism that allows a light touch and action without slipping. The ratchet means you can feel the tiny little 'clicks' when moving them, so they're not quite as smooth as the Simplex - but it's still a very effective solution.

One of the great things about the SunTours is that they were made for many years with only the slightest changes, and they are almost completely re-buildable. Most (maybe all) of the small parts are interchangeable from one year to the next, so they're virtually immune to obsolescence. And believe it or not, you can still find the parts.
Here's an interesting one - Shimano "Fingertip Control" bar-ends. No group name on them, but I sometimes see them listed for sale as Dura Ace. Circa late '70s, I believe. These have a large coil spring inside which counterbalances the spring in the derailleur. No clicks or ratchets. No clutch. Just one spring working against another.

This is what the Shimano shifter looks like inside - it's very simple, really. Here's how they work: The spring in the rear derailleur is typically "high normal" - in other words, its natural position is to be in the high gear (smallest cog). The spring in the lever is "low normal" - in that it wants to move the derailleur to the lowest gear (largest cog - and by the way, this is all completely reversed for the front derailleur). To set them up, you have to move the lever against the spring to the opposite end of its travel and hold it in place while you pull all the slack out of the cable at the derailleur and then tighten the pinch bolt. It helps to have one of those cable pulling tools, aka a "4th hand tool." When you have them all set up properly, the two springs basically fight it out, tug-of-war style, and the derailleur stays in place where you put it. The movement takes a fairly light touch as there is very little friction. The same mechanism was also used in early Shimano Deore "thumb shifters" for mountain bikes.

Some more modern/current options:
Modern Shimano Indexing levers - available for 8, 9, 10, and even 11 speeds. My Rivendell has the 9-speed version - nearly 20 years old and still going strong. I don't know about the 10 and 11-sp. versions, but my old 9-sp. ones can be switched from indexing to friction, but the indexing is bulletproof so there'd be no reason to switch them. The bodies, or "pods" have been copied by other makers because they are compatible with many standard downtube shift levers - which means customizing options.


Current production Dia Compe levers. Notice that the pods are identical to the Shimano pods shown above. The levers have an extra-fine version of the SunTour Power Ratchet mech. Grant Petersen/Rivendell was instrumental in getting that ratchet mechanism resurrected, originally for a near-exact re-issue of the late '80s SunTour Sprint shifters (dubbed "Silver"), which they would then pair with the Shimano pods for some smooth-action bar-ends. Dia Compe later made this more "traditional" styled lever with the same internal mechanism. The levers themselves can be mounted on the pods, or on the downtube.

The latest version of the Rivendell Silver shifters (Silver 2) is without a doubt styled with bar-end and thumb-shifter applications in mind. Currently available from the Rivendell website.

I have bar-ends on a number of my bikes. I like them for their convenience and for all those "-ity's." You know the ones I mean: simplicity, reliability, durability, and repairability. It's nice to know such things are still valued enough to be an option in a throwaway world.

Friday, January 24, 2020

Gathering Parts - Drivetrain

As I'm gathering my parts for the early '80s Specialized Sequoia build and describing my selections, my next installment is on drivetrain components.

Crank: My first/ideal choice for a crank would be to find an early '80s Specialized "Flag" crank (like the one on my Expedition). Problem is that those seem to be pretty scarce these days - or rather, ones in my preferred length that aren't scuffed to hell and back are scarce. I'll keep my eyes peeled, but for now, I'm going to be mounting a mid-'80s Sakae FX. In terms of style, they're really not so different.

The lightly used Sakae crank is in excellent condition, worthy of a restored frame. The screen-printed logo on the drive-side arm was scratched, so I just removed what was left of it. I'm debating whether or not to do the same to the left arm. Otherwise the finish is in great shape. It's a 110/74 triple, but I left off the granny ring, making it more like a "compact" double. Current chainrings are 50/36.
Pedals: I have this pair of SunTour Superbe pedals that I found on eBay. They were used but in very good shape, and the bidding stayed low (probably because they were mis-identified in the listing). I also found a great deal on a pair of NOS replacement cages, and even though the original ones were only a little scuffed and more than presentable, I decided to swap them. The pedals now look almost new, and I have the other cages for spares.

Brand new cages, and polished bodies make these look almost like new. The sealed bearings are so smooth. I'm not sure who actually made these for SunTour, but if I had to guess, I'd say MKS.
Derailleurs: I had three different generations of Cyclone derailleurs to choose from, but ultimately decided upon the M-II version. It just seemed like it would be the best match for the early '80s Sequoia.

The long-cage rear derailleur should handle the gearing I've chosen really well. I had a matching Cyclone M-II front derailleur, which helped make the choice even easier. One thing I don't know is how well that front derailleur will work with the big 14-tooth gear jump on my crank. A lot of modern front derailleurs will handle that just fine, but I'll just have to see how that goes with a changer that was probably designed for a 42/52 crank.
Freewheel: Shimano 600

Is there something sacrilegious about putting a Shimano freewheel on an otherwise SunTour build? Vintage SunTour Winner (and New Winner) freewheels are probably my favorites, but I looked through my stash of old freewheels hoping to find something in a 13-28, and this NOS Shimano was the only one that fit the bill. But truthfully, the old Shimano 600 and Dura-Ace freewheels are awfully hard to fault - exceptionally smooth, quiet, and durable. And some people feel that the tooth profile makes for better shifting than even the old SunTour ones. So there's that.
Shift Levers: Hmmmm. . .

Still thinking about this one. I've got vintage SunTour power ratchet downtube levers which would be the good match for age, but the "look" is a little old-fashioned or clunky compared to the smoothed out "aero" components of the '80s. I've got SunTour power ratchet BarCons, which match the age, and fit with the fact that I really like BarCons. And I also have a pair of the SunTour Sprint ratcheting levers, which were the final and best version with a super fine ratchet mechanism and that smooth '80s style - unfortunately, they are for brazed-on shifter posts, and my Sequoia needs clamp-on levers. I could go searching for a compatible clamp for them (is it worth the trouble?), or I could have asked the painter to add shifter braze-ons (too late for that, though). I'll come back to this one.

That's all I've got for the moment. Stay tuned . . .

Tuesday, January 21, 2020

Gathering Parts - Wheels and Tires

With my Specialized Sequoia frame off at the painters, I'm taking time to go through my parts for the build. My next few posts will be dedicated to that subject, and it seems to me that wheels are a good place to start.

I found a set of complete vintage wheels that seemed like they'd be the perfect match for my project - '80s vintage SunTour Cyclone hubs with Araya 700c rims and stainless spokes (32 front and rear). They were used, but appeared to be in good condition: the hub bearings felt perfect and smooth, the rims appeared to be in excellent condition, and the wheels ran true. The hubs looked a bit dull/tarnished - but with a bit of elbow grease, I was able to make them look suitable for a freshly restored frame.

I suspect these wheels were original equipment on a pretty nice complete bike from the period. Telltale signs: plastic "pie plate" spoke protector under the freewheel, and CPSC-mandated plastic reflectors attached to the spokes. Obviously those items are now in the trash.

The Cyclone sealed bearing hubs were very similar to hubs sold with the Specialized brand in the '80s - and both brands were made by Sansin. As usual, the screen-printed labels were a bit scratched up. The rear one doesn't look too bad, but the one on the front hub was unreadable, so I removed what was left of it when I did my polishing.
The SunTour quick release levers looked about perfect when I got the wheels.
The Araya rims appear to have an anodized finish, with double eyelets at the spokes (a nice touch) and look great. They would have been a popular rim on many higher-end Japanese-built bikes in the '80s.

My first instinct for tires was the Panaracer Pasela - a great all-around road tire at a great price. But then I found a good price on a pair of Panaracer Gravel King tires, which made them only a few dollars more per tire. The Gravel Kings have a slightly more supple casing, and a fine file tread. Haven't tried them yet, but my first observation is that they were a little harder to get mounted. I had to get out the Kool Stop tire jack to get the last couple inches of bead over the rim. That sort of thing sometimes makes me a little nervous, as I worry about what happens if I get a flat out on the road. I have a small VAR tools tire jack that's packable, so I'll have to remember to keep that handy just in case. Otherwise, they mounted up straight and even all the way around - like all the Panaracer-made tires I've used.
Stay tuned for more. . .

Monday, January 13, 2020

Old is Good: Specialized Sequoia

Back in the early '80s when I was first catching the bike bug, Specialized was likewise just starting to expand from tires and other bike components to frames and complete bikes. Their Allez and Sequoia models were the first offerings, soon followed by the Stumpjumper mountain bike, and the Expedition grand tourer. With well-designed frames and top-notch Japanese construction, their early bikes were lustworthy - and to a lot of retrogrouches, they still are.

I have had one of the early Stumpjumpers for a while now. It has become my kid-and-grocery hauler. For a lot of years, that was the bike to which I'd attach the Burley or the Trail-a-Bike kid trailers (sometimes both simultaneously). Nowadays I hook up an old Burley that I converted into a flatbed cargo trailer and haul groceries. Those early Stumpies have some cool build details, like lugged frame, fastback seat stay cluster, and a cool twin-plate "bi-plane" fork crown. I had mine powder coated in "Kawasaki green" and "updated" it with mustache bars and slightly more modern components ('90s instead of '80s).

A few years ago, I restored an '83 Expedition. That one is a real beauty, and one of the best long-haul touring bikes of its time (or any time?). I kept consistent with what was original, and made some reasonable updates and upgrades to the components, using '80s vintage Specialized components wherever possible - like crank, pedals, seat post, etc.. I also took advantage of the fact that the frame was wired from the factory for a bottom bracket generator, and installed the generator and a headlight for some on-demand lighting.

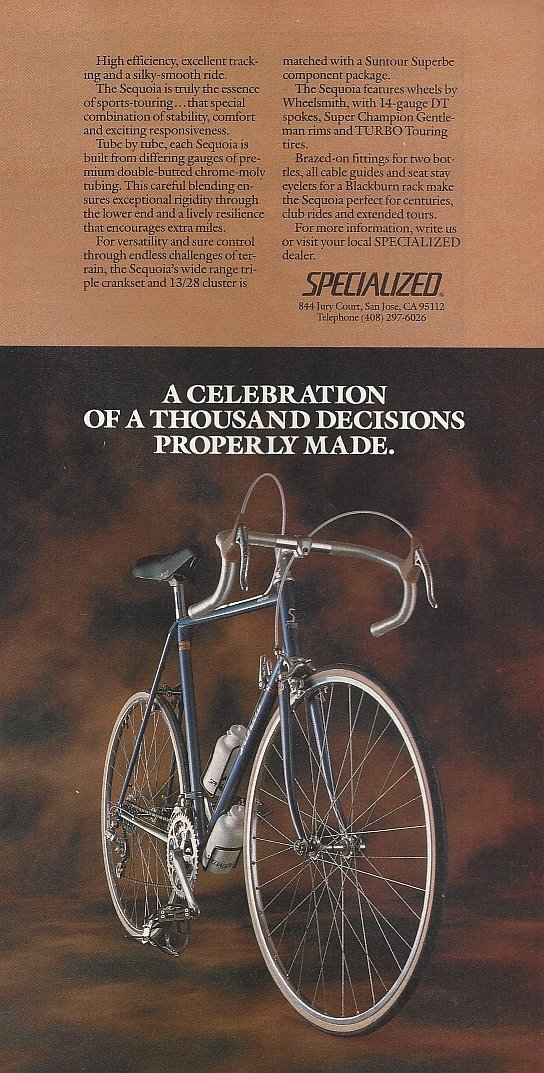
An ad from 1982
Always interested in "completing a set" of the early Specialized bikes, I've long had my eye open for the early generation Allez and Sequoia models. It wasn't long ago I got outbid on a 1st-gen Allez, designed by Tim Neenan (currently of Lighthouse Cycles) and possibly built by Yoshi Konno (of 3Rensho fame). I would have had to see it up close (or have had some better pictures) to say for sure if it was a Konno-built Allez, but I was interested in it regardless. Ultimately it didn't matter, as I hadn't bid enough to win it anyhow.

Recently I found the other bike I'd been looking for. A decent '82 Sequoia frame came up in my size for a price I could live with. The paint was pretty scratched up, there was some minor surface rust, and the decals were faded and/or peeling. But the chrome was still good, and there were no dents or dings, so I thought it would be a good candidate for restoration.


Like the original Allez, the Sequoia was also designed by Neenan, and the very first shipment of them (consisting of a few hundred frames as I understand it) were also built in Japan by Konno. Those ones can be identified easily because they have a fastback seat stay cluster. One can see a picture of Mike Sinyard's Konno-built Sequoia in a BikeRumor article about Specialized's headquarters and museum. Frames like mine, with a tidy, fluted seat stay treatment, were either built by Toyo, or the Miki frame shop (or possibly even Miyata) but I can't say for sure which one. I've looked into it, and even the people who were involved with frame production at Specialized in the '80s (Tim Neenan, Bryant Bainbridge, and Jim Merz - all of whom still participate in the various online bike groups/forums) seem to have some conflicting info about which frames were made where or when. I mean, we're talking about nearly 40 years ago, now. I imagine they could all be equally correct and incorrect in their memories to some extent, and different shipments could have come from different sources in different years.


The Sequoia was meant to be the ultimate "sports tourer" - a fast, racy bike that could accept a rack and do some light touring - a great "all-'rounder" road bike. It was designed for "normal reach" brakes (which by today's standards would be like "medium-long") and could fit larger tires than an all-out racing bike of the day. I haven't put tires into it yet, but I expect (or am hopeful) 32mm tires would fit - though maybe not with fenders. A 1982 Bicycling magazine test gave the bike excellent marks for ride quality, giving much credit to the specially selected Tange tubing - with a heavier-gauge down tube, but lighter top and seat tubes. That review also had the Sequoia fully equipped for touring with racks and panniers both front and rear.

I did narrow mine down to '82 by looking at a few details (besides the fact that that was how it was sold to me). One is the look of the decals, which are the second style, but still have the "Designed by Tim Neenan" sticker on the chain stay. The bikes later underwent a minor redesign by Jim Merz - I think maybe in '83(?). Mine also lacks shift lever bosses, which I believe were probably added in '83. From what I can gather by looking closely at other examples I've seen, I think when Merz updated the design, the frames got slightly shorter point lugs and a fork crown engraved with a slash-style Specialized "S" icon. The lugs on mine are very long-pointed, and the fork crown is bare. Also, the Merz redesign added some bottle cage bosses to the seat tube, whereas mine has bosses on the down tube, and another pair under the down tube (as seen in the '82 ad above), but none on the seat tube. That under-the-down-tube bottle location is an odd one. Loaded touring bikes would sometimes have it (my Expedition does, for example) and many riders would use it to hold a camp stove fuel bottle. It's an odd thing on a bike like the Sequoia though, and I'm likely to never put those bosses to any use. Fun side note: I once saw where someone had a mini-sized bottle cage on that set of "underneath" bosses that held a bottle of Phil's Tenacious Oil. Why anyone would need to carry a whole bottle of Phil's oil with them on rides, I couldn't say - but it was cool and quirky enough to make me want one.


So now that I've got the frame, I'm evaluating what parts I have, and what parts I'll need to complete the bike. As pointed out in my last post, I have several nice old SunTour Cyclone derailleurs to choose from, as well as a pair of normal reach Superbe brakes, and Cyclone hubs - so I'm thinking I'll do a mostly SunTour build-up, which is how a lot of these left bike shops in the early '80s.

I'll have more on that in upcoming posts. Stay tuned. . .